
Your voucher settings control what customers see at checkout and how your vouchers behave. You set them once, under Settings on the voucher dashboard, and they apply to every voucher your customers buy.
This page covers the Basic section, which defines the voucher itself, and the Links/Contact section, which controls how customers reach you. If you are setting up for the first time, start with the Quick Start, which covers only what you need to go live.
Save as you go
Each section has its own Save button. Save a section before moving to the next one, or you will lose your changes.
Where each setting lives
The settings screen is split into sections. Most have a page of their own.
| Section | What it controls | Where to read more |
|---|---|---|
| Basic | The voucher itself: name, amounts, expiry, checkout copy | This page |
| Links/Contact | Support email and where customers are sent | This page |
| Brand | Logo, voucher image, theme, colours, PDF template | Branding |
| Payments | Currency, gateway, Stripe connection, surcharge | Payments |
| Pickup and Delivery | Physical gift card collection and postage | Physical Gift Cards |
| POS | Redeeming vouchers in-store | Point of Sale |
| Legal | Terms and conditions, GST number, legal name | Legal |
For a one-line definition of any individual field, see the Field Reference.
The Basic section
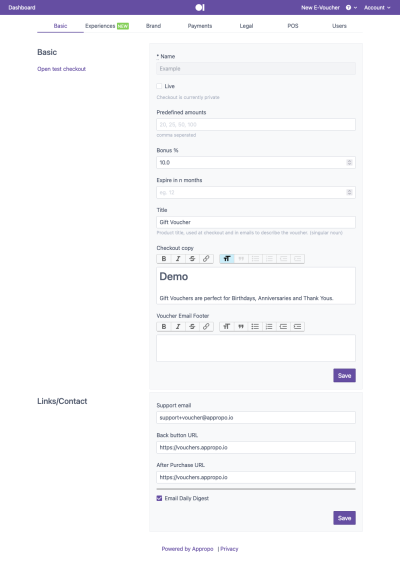
The Name, Predefined Amounts and Expire in X Months fields come pre-filled with sensible defaults, so you do not have to change anything here to go live. Adjust them when you want the checkout to reflect your own pricing.
Name and Title
Name identifies the voucher (e.g., “Example”). Title is a short description of it. Both are shown at checkout and in the emails that deliver the voucher.
Predefined Amounts
A comma-separated list of the values customers can choose from, such as 20, 30, 50. Add CUSTOM to the list to let customers enter their own amount, for example 20, 30, 50, CUSTOM.
These do most of the work at checkout, because most customers pick one of your options rather than think about a number. Three or four is usually enough. Set them around the price of something real at your venue, a brunch for two or a dinner for four, so the amount means something to the person buying.
CUSTOM is worth adding for corporate orders and for people topping up to a specific figure.
Bonus %
Optional. Adds extra value on top of the amount the customer pays. Leave blank if not applicable.
This is a common promotion around Christmas and Mother’s Day, where the extra value brings the recipient back through the door a second time. The bonus increases your outstanding voucher liability, so treat it as a marketing cost rather than free money.
Expire in X Months
The voucher’s expiry period. By law, this must be at least 36 months.
Checkout Copy
A description of the voucher shown to customers during checkout.
This is the last thing someone reads before paying, so keep it short and answer the obvious questions: what the voucher can be spent on, whether it can be used across multiple visits, and whether booking is required. Anything longer belongs in your terms and conditions.
Voucher Email Footer
Text shown at the bottom of the email that delivers the voucher. You can include links here.
Include PDF
Optional. Attaches a PDF version of the voucher to the voucher email.
Worth enabling if customers are likely to print the voucher or hand it over as a physical gift. The PDF layout is set separately, in the PDF template under Branding.
Live
Makes the voucher available to customers. Until this is switched on, your storefront is not public.
The Links/Contact section
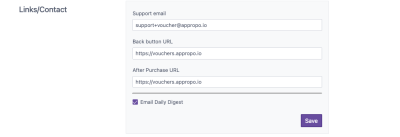
- Support Email — where customers can reach you with questions.
- Back Button URL — where customers land if they navigate back during checkout.
- After Purchase URL — where customers are redirected once they’ve completed their purchase.
- Email Daily Digest — enable this to receive a daily email summary of voucher activity.
Use a monitored address for the Support Email. It is the address a customer will use when a voucher does not arrive, and those enquiries are time sensitive around Christmas.
Point the two URLs at your own website rather than leaving them blank, so customers stay with you instead of hitting a dead end. A thank you page or your bookings page both work well after purchase.
Issuing vouchers outside the storefront
The settings above cover vouchers customers buy themselves. You can also issue vouchers directly:
- Bulk Create Vouchers — upload a CSV to issue many vouchers at once, for corporate gifts, campaigns or events.
- Complimentary Vouchers — send a one-off voucher to a customer without a purchase, for a goodwill gesture or service recovery.
- Gift Experiences — sell fixed-price packages, such as two mains and a bottle of wine, instead of a dollar value.
Checking your changes
After saving, go to the Basic section and select Open test checkout to see your settings as a customer would. Complete a test purchase so you also see the confirmation email, and the PDF if you have enabled one.
Track what sells through the Dashboard.