
Use the Brand section to make the voucher checkout and the voucher itself look like they belong to your venue. You can add your logo and voucher image, choose a checkout theme, set your colours, refine the checkout with CSS and configure the voucher PDF template.
None of this is required to start selling. If you are setting up for the first time, get live with the Quick Start and come back here.
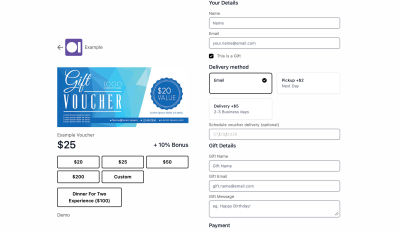
Where your branding appears
Your customers see your branding in three places, and they are styled separately.
- The checkout — the page where customers choose an amount and pay. Controlled by your logo, theme, colours and Custom CSS.
- The voucher email — the email that delivers the voucher. Shows your logo and your Voucher Email Footer. Custom CSS does not apply here.
- The voucher PDF — the optional PDF attached to the voucher email. Styled entirely within the PDF template, not by your checkout settings.
Change something on the checkout and it will not carry through to emails or the PDF. Check all three before you call the job done.
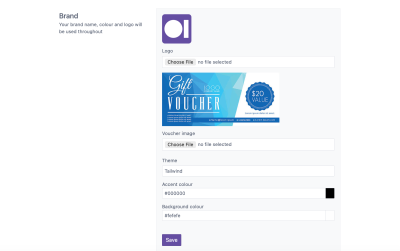
Logo
Your logo is displayed on the voucher checkout page and in voucher emails sent to customers.
Recommended size
A landscape PNG logo with transparency. 600x100px.
Use transparency so the logo sits cleanly on whatever background colour you choose. A logo with a solid white box behind it will show that box against a dark background. If your logo is square or stacked, a landscape version usually reads better in the space available.
Voucher image
Upload an image to display on the voucher. This can be a store image, product image, promotional artwork or another image that represents your business.
Choose something that still reads at a small size, and avoid images with text baked into them, as that text cannot be resized or translated. A photograph of the venue or a signature dish usually works better than a busy collage.
Theme
Choose the theme you want to use for your voucher checkout.
- Minimal — a simple theme option with a streamlined layout.
- Tailwind — a theme option based on the Tailwind design system, providing a structured checkout layout.
- Tailwind+ — an extended Tailwind-based theme option with additional styling and layout features.
Select a theme and review your voucher checkout to determine which option best suits your requirements. The quickest way to decide is to set each one, save, and open the test checkout, so you are comparing the real thing rather than a description. You can further adjust the appearance using the colour settings or Custom Styling.
Colours
- Accent Colour — used for buttons and highlights.
- Background Colour — the page background colour.
Format
Use the colour hex code. ie. #ffffff
Keep enough contrast between the two. The accent colour carries your buttons, so if it sits too close to the background the call to action stops standing out and customers hesitate at the point of paying. The payment submit button also uses the accent colour to create a shine effect when the form is ready to submit.
Custom CSS
The Brand settings control the main theme, colours and images. For more granular changes to the checkout, use Custom Styling to adjust elements such as fonts, spacing, borders, sizing and layout.
See Customisation for more information on Custom CSS.
Emails are not styled
Custom CSS doesn’t apply to emails
Embed URL
The Embed URL can be used to embed your voucher checkout into another webpage.
Use it when you would rather keep customers on your own site than send them to a separate voucher page. Add it to your website as an embedded frame and the checkout appears inside your existing page, so your site navigation stays in place around it.
Voucher PDF
The Voucher PDF section is used to configure the template for generated voucher PDFs. Add your PDF template using Liquid HTML. The template controls the content and layout of the generated voucher PDF. If you have enabled Include PDF in your voucher settings, the generated PDF can be attached to the voucher email.
A PDF is worth enabling if customers are likely to print the voucher or hand it over as a physical gift. If vouchers are only ever redeemed from a phone, you may not need one.
See Customisation for more information on Liquid HTML.
Save and preview
- Click
Saveafter making your branding changes. - Go to the
Basicsection. - Select
Open test checkoutto preview your voucher. - Review the branding, colours, buttons and layout.
- Complete a test purchase so you also see the voucher email, and the PDF if you have enabled one.
- Return to
Brandto make any further changes, then save again.
Check the checkout on a phone as well as a desktop. Most voucher purchases are made on a phone, often as a last-minute gift.